
yja
10. 빈 스코프 본문
빈 스코프란?
빈 스코프란, 빈이 생성되어서 종료될 때까지의 존재 범위를 의미한다.
- 스프링이 지원하는 다양한 스코프
- 싱글톤: 스프링 컨테이너의 시작 ~ 종료
- 프로토타입: 스프링 컨테이너는 빈 생성과 주입까지만 관여하고, 종료는 클라이언트에게 넘긴다.
- 웹 관련
- request: 웹 요청이 들어오고 나갈때까지 유지
- session: 웹 세션이 생성되고 종료될때까지 유지
- applicaion: 웹의 서블릿 컨텍스트와 같은 범위로 유지
프로토타입 스코프
싱글톤 빈과는 달리, 프로토타입 빈 요청은 항상 다른 인스턴스를 생성해 반환한다.
스프링 컨테이너는 생성되는 시점에 필요한 의존관계를 주입한다.
프로토타입 스코프 = [빈 생성 + 의존관계 주입 + 초기화]
이후에 스프링 컨테이너는 프로토타입을 관리하지 않는다.

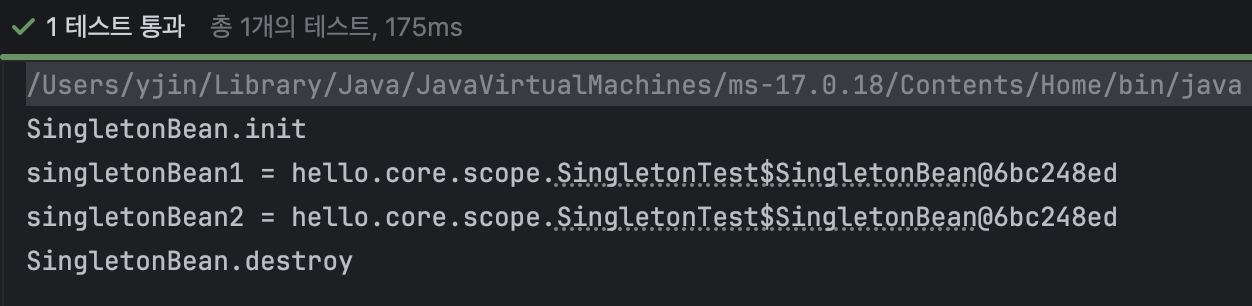
싱글톤 스코프 빈 테스트
@Scope("singleton")
static class SingletonBean {
    @PostConstruct
    public void init() {
        System.out.println("SingletonBean.init");
    }

    @PreDestroy
    public void destroy() {
        System.out.println("SingletonBean.destroy");
    }
}
// 두 인스턴스가 같은지 확인
SingletonBean singletonBean1 = ac.getBean(SingletonBean.class);
SingletonBean singletonBean2 = ac.getBean(SingletonBean.class);
이처럼 `init()` 초기화 메서드와 `destroy()` 종료 메서드가 모두 실행되었고, 두 인스턴스는 같다.
싱글톤 스코프 = [빈 생성 + 의존관계 주입 + 초기화 + 종료] 인것을 알 수 있다.
프로토타입 스코프 빈 테스트
@Scope("prototype")
static class PrototypeBean {
    @PostConstruct
    public void init() {
        System.out.println("PrototypeBean.init");
    }

    @PreDestroy
    public void destroy() {
        System.out.println("PrototypeBean.destroy");
    }
}
System.out.println("find prototypeBean1");
PrototypeBean prototypeBean1 = ac.getBean(PrototypeBean.class);
System.out.println("find prototypeBean2");
PrototypeBean prototypeBean2 = ac.getBean(PrototypeBean.class);
프로토타입 스코프의 빈은 빈 조회시에 (인스턴스가 다른) 새로운 빈으로 생성되는 것을 확인할 수 있다.
종료 메서드인 `destroy()`는 실행되지 않는다. 종료 메서드의 호출은 클라이언트의 책임으로 넘어간다.

싱글톤 패턴과 함께 사용시 문제점
clientBean 싱글톤 빈이 프로토타입 빈을 의존관계 주입으로 받는 상황에서,
클라이언트가 프로토타입 빈에 addCount() 를 호출해서 count ++ 를 한다고 하자.
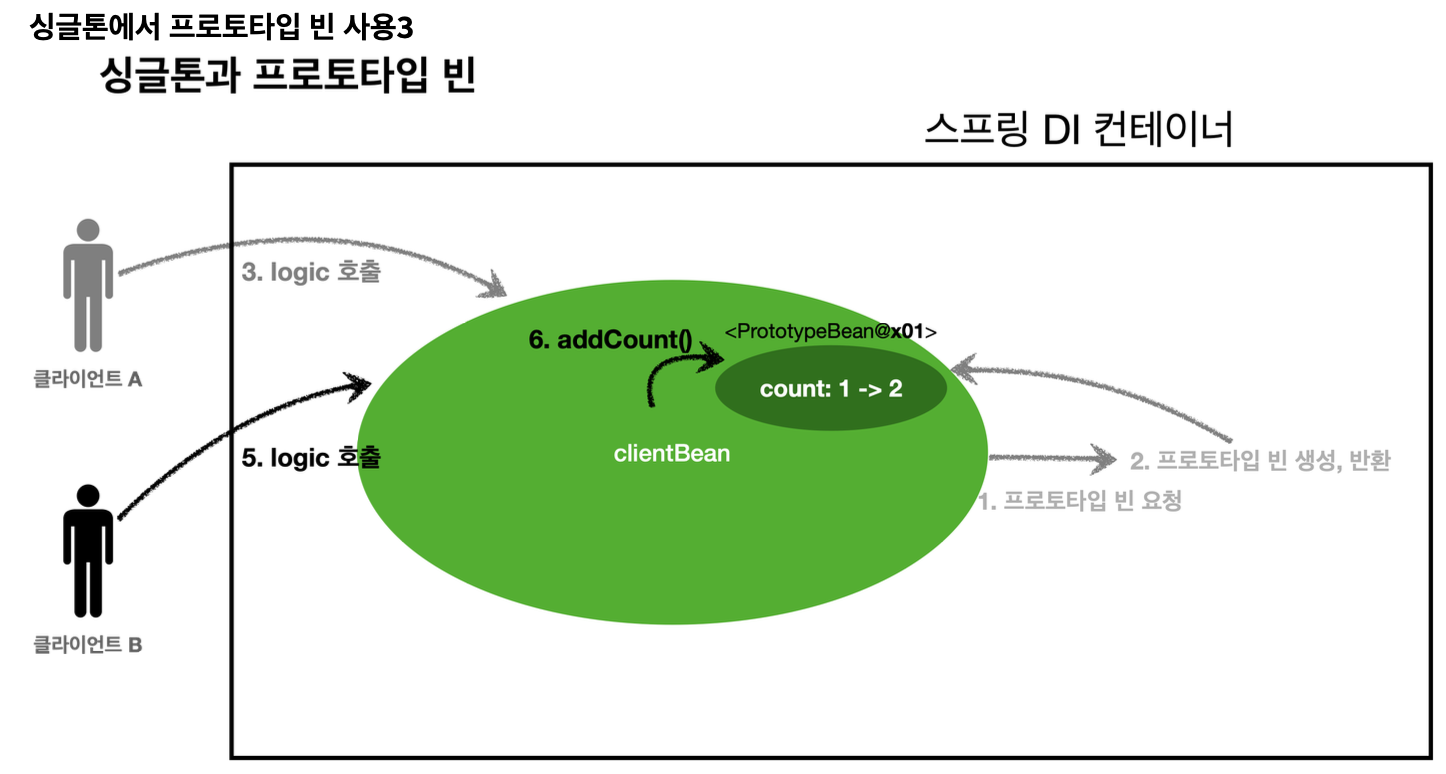
클라이언트 A가 logic()을 호출해 count: 0->1 로 변경시켰다.
그 다음 클라이언트 B도 logic()을 호출하면 count: 1->2로 변경된다.
각각의 프로토타입 빈이 따로 생성되지 않고 하나를 공유하게 되는 문제가 발생한다.
주입 시점에만 프로토타입 빈이 새로 생성된 것이고, 사용할 때마다 생성되지 않는다.
프로토타입 빈
@Scope("prototype")
static class PrototypeBean{
    private int count = 0;

    public void addCount() {
        count ++;
    }

    public int getCount() {
        return count;
    }

    @PostConstruct
    public void init() {
        System.out.println("PrototypeBean.init " + this);
    }
    @PreDestroy
    public void destroy() {
        System.out.println("PrototypeBean.destroy");
    }
}
싱글톤 빈1
@Scope("singleton") // 싱글톤 빈
static class ClientBean {
    private final PrototypeBean prototypeBean; // 생성 시점에 주입되어 계속 같은 걸 쓰게 된다.

    ClientBean(PrototypeBean prototypeBean) {
        this.prototypeBean = prototypeBean;
    }

    public int logic() {
        prototypeBean.addCount();
        int count = prototypeBean.getCount();
        return count;
    }
}
싱글톤 패턴과 함께 사용시 Provider로 해결
싱글톤 빈2 - ObjectProvider
빈을 주입받게 되면 싱글톤처럼 작동하기 때문에, 빈을 주입받지 않고 빈을 찾아주는 대리자(Lookup)를 주입받는다.
ObjectProvider는 지정할 빈을 컨테이너에서 대신 찾아주는 Dependency Lookup 을 제공한다.
`getObject()`를 호출하는 그 순간에 스프링 컨테이너가 새로운 PrototypeBean을 생성해서 반환한다.
// 해결1: ObjectProvider을 사용한다. -> getObject(); 호출되면 그때서야 프로토타입 빈을 찾아준다.
// 단점은 스프링에 의존적이라는 것!
@Scope("singleton") // 싱글톤 빈
static class ClientBean {

    @Autowired
    private ObjectProvider<PrototypeBean> prototypeBeanProvider;

    public int logic() {
        PrototypeBean prototypeBean = prototypeBeanProvider.getObject();
        prototypeBean.addCount();
        int count = prototypeBean.getCount();
        return count;
    }
}
싱글톤 빈3 - 자바의 Provider
`get()` 을 통해서 항상 새로운 프로토타입 빈이 생성된다.
라이브러리를 추가해야하지만, 자바 표준이어서 스프링이 아니더라도 사용할 수 있다.
// 해결2: 자바의 Provider을 사용한다. 대신 gradle 추가해줘야함
// 장점: 스프링에 의존적이지 않다!
@Scope("singleton") // 싱글톤 빈
@Component
static class ClientBean {

    @Autowired
    private Provider<PrototypeBean> provider;

    public int logic() {
        PrototypeBean prototypeBean = provider.get();
        prototypeBean.addCount();
        int count = prototypeBean.getCount();
        return count;
    }
}
웹 스코프
웹 스코프는 생성부터 종료시점까지 관리한다.
웹 스코프에는 request, session, application, websocket이 있는데 그중 request 웹 스코프에 대해 알아보자.
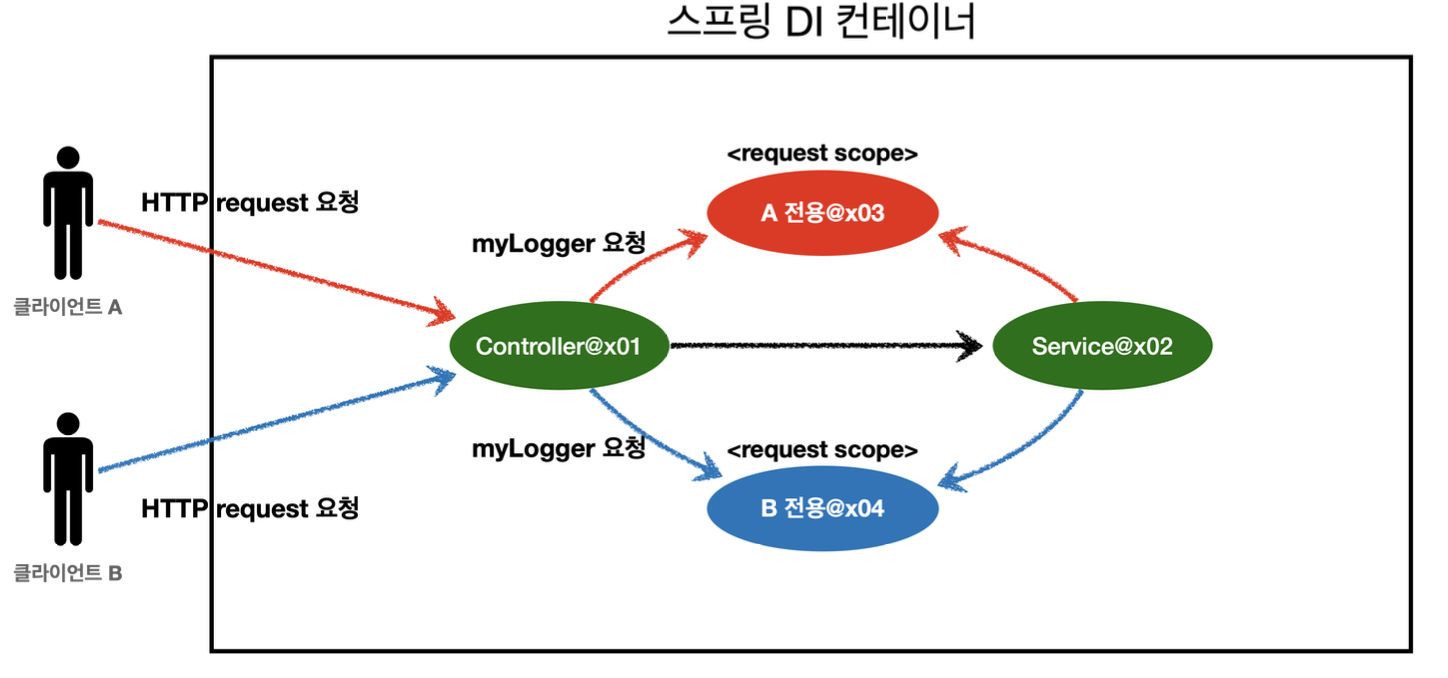
request 웹 스코프는 요청이 들어올때부터 나갈때까지의 스코프이다.
각 요청마다 따로 request 스코프가 생성되고 관리된다.
request 스코프 예제 만들기
MyLogger: request 스코프
로그 출력을 위한 클래스이다.
@Component
@Scope(value = "request") // request scope
public class MyLogger {

    private String uuid;
    private String requestUrl;

    public void setRequestUrl(String requestUrl) {
        this.requestUrl = requestUrl;
    }

    public void log(String message) {
        System.out.println("[" + uuid + "] " + "[" + requestUrl + "] " + message);
    }

    @PostConstruct
    public void init() {
        uuid = UUID.randomUUID().toString();
        System.out.println("[" + uuid + "] request scope bean create:" + this);
    }

    @PreDestroy
    public void close() {
        System.out.println("[" + uuid + "] request scope bean close:" + this);
    }

}
Controller1
localhost://8080/log-demo로 요청이 들어오면 로그가 찍힐 것이다.
그런데 오류가 난다!
request 스코프 빈은 고객의 요청이 와야 생성이 되는 빈인데 어플리케이션 실행 시점에 request 스코프 빈이 없어 의존관계 주입이 되지 않기 때문이다.

@Controller
@RequiredArgsConstructor
public class LogDemoController {

    private final LogDemoService logDemoService;
    private final MyLogger myLogger; // 시도1

    @RequestMapping("log-demo")
    @ResponseBody
    public String logDemo(HttpServletRequest request) throws InterruptedException {

        String requestURL = request.getRequestURL().toString();
        myLogger.setRequestUrl(requestURL);

        myLogger.log("controller test");
        logDemoService.logic("testId");
        return "OK";
    }


}
스코프와 Provider
Controller2 - ObjectProvider
이 문제는 Provider을 통해 해결할 수 있다.
getObject()를 호출하는 시점까지 request 스코프 빈의 생성을 지연시킬 수 있기 때문이다.
// private final MyLogger myLogger; // 시도1 ❌
private final ObjectProvider<MyLogger> myLoggerProvider; // 시도2

public String logDemo(HttpServletRequest request) throws InterruptedException {
    MyLogger myLogger = myLoggerProvider.getObject(); // 추가 // 시도2
    // ..
}
스코프와 프록시
Controller3 - proxy
프록시 방식을 사용하면 더 간단하게 해결할 수 있다!
`proxyMode = ScopedProxyMode.TARGET_CLASS` : MyLogger라는 가짜 프록시 클래스를 만들어두고 미리 다른 빈에 주입해줄 수 있다. 그리고 요청이 왔을 때 진짜 빈으로 대체해준다.
@Component
// 프록시 모드: 가짜 프록시 클래스를 만들어서 주입해준다. 마치 provider처럼 동작한다. // 시도3
@Scope(value = "request", proxyMode = ScopedProxyMode.TARGET_CLASS)
public class MyLogger {}
public class LogDemoController {
private final LogDemoService logDemoService;
// private final ObjectProvider<MyLogger> myLoggerProvider; // 시도2
private final MyLogger myLogger;
}
이렇게 클라이언트마다 간격을 가지고 요청하면 한번에 이루어지니까 필요없다고 생각할 수도 있다.
그런데 클라이언트가 동시에 접근하면 이걸 구분해야한다.
동시에 접근하도록 로직을 수정해보자.
myLogger.log("controller test");
Thread.sleep(1000); // 추가 // 여러 사용자가 동시에 요청이 들어오는 경우 테스트
'~64' 사용자의 요청과 '~c8' 사용자의 요청이 동시에 와서 섞인다.
우리는 request scope을 구현했기 때문에 다른 사용자이면 다른 request 스코프 빈이 생성되어 서로 요청이 구분할 수 있다.
'[Web-Back] Spring > 스프링 핵심 원리 - 기본편 (강의)' 카테고리의 다른 글
| 9. 빈 생명주기 콜백 (0) | 2026.04.29 |
|---|---|
| 8. 의존관계 자동 주입 (1) | 2026.04.27 |
| 7. 컴포넌트 스캔 (0) | 2026.04.06 |
| 6. 싱글톤 컨테이너 (1) | 2025.08.25 |
| 5. 스프링 컨테이너와 스프링 빈 (0) | 2025.07.26 |


